Last Updated on September 6, 2023
Thermocouple is a small but extremely important water heater component that detects the pilot light’s presence and ensures safe operation. But with time, the thermocouple can accumulate corrosion, leading to issues with heating efficiency and even pilot light failure. Then you must clean it promptly but efficiently.
To clean your water heater thermocouple, remove the burner assembly and disconnect the wires. Also, the thermocouple should be tested using a multimeter to ensure it functions properly, with a 25-30 millivolts voltage reading before cleaning.
In this comprehensive cleaning guide, we will discuss the process of cleaning your water heater thermocouple, step by step, to help you restore your water heater’s functionality and efficiency. So continue reading for detailed information.
How to Clean Water Heater Thermocouple: DIY Step-by-Step Guide
To clean your water heater thermocouple, follow these step-by-step processes:
- Step 1: Prioritize Your Safety
- Step 2: Access the Thermocouple
- Step 3: Detach the Burner Assembly
- Step 4: Test the Thermocouple
- Step 5: Cleaning the Thermocouple
- Step 6: Reassemble with Care
- Step 7: Reignite the Pilot Light and Monitor the Performance
Materials You’ll Need:
- Adjustable wrench
- Emery cloth sandpaper
- Lint-free cloth
- Screwdriver
- Multimeter
Step 1: Prioritize Your Safety
Safety is paramount when working with a water heater thermocouple. Before starting, turn off your water heater’s gas supply or power and have safety goggles and gloves on.
These simple steps can prevent potential hazards while working on your water heater thermocouple, ensuring a safe environment throughout the cleaning process.
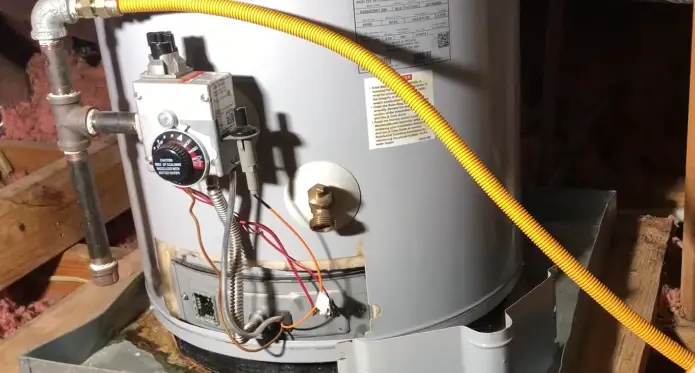
Step 2: Access the Thermocouple
Now, locate the burner assembly cover that will give you immediate access to the thermocouple. This cover is usually found near the pilot light in the bottom section of your water heater.
To access the thermocouple, start by removing the burner assembly cover. Use your screwdriver to unscrew any screws or bolts securing it in place.
Step 3: Detach the Burner Assembly
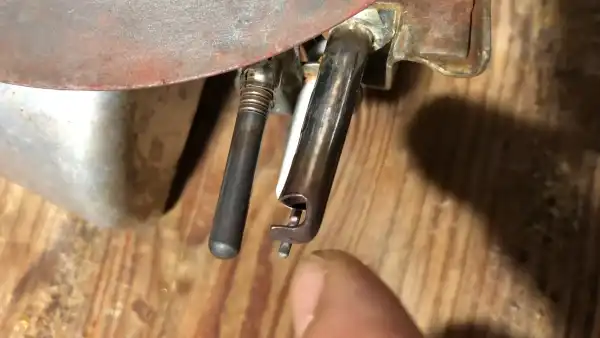
Once you remove the burner assembly, you will see the thermocouple connected to the gas valve. After removing the burner assembly cover, disconnect the wires connected to the control center.
Start by locating the thermocouple wire and gently pulling it out of its socket. Be careful not to damage the wire or any surrounding components during this process.
Next, locate the main supply tube and pilot supply tube wires. Disconnect these wires by carefully removing each connector from its respective terminal on the control center. It may be helpful to take a photo of the assembly before detaching for reassembly guidance later on.
Step 4: Test the Thermocouple
Once all wires are disconnected, you can test your water heater thermocouple to check its efficiency. To test the thermocouple, you’ll need to use a multimeter set to measure volts and heat the thermocouple with an open flame.
Ignite an open flame near the tip of the thermocouple and allow it to heat up for a few seconds. While the flame is still applied, carefully place one probe of the multimeter on the connection terminal of the thermocouple and touch the other probe to the outer casing or body of the water heater.
If your thermocouple functions correctly, the multimeter should display a voltage reading between 25-30 millivolts. If you do not see any voltage or if it falls outside this range, it may indicate a faulty or worn-out thermocouple that needs replacement.
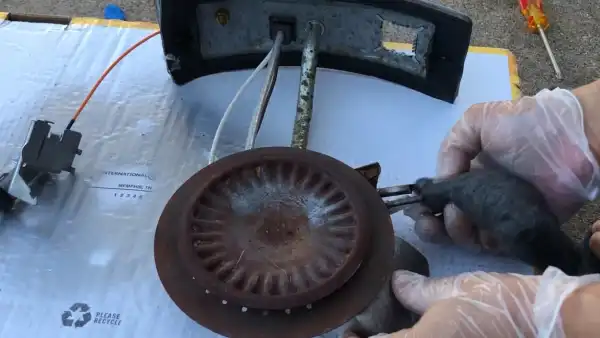
Step 5: Cleaning the Thermocouple
Your water heater’s thermocouple needs to be cleaned carefully if it is functioning properly. Make sure you have sandpaper or steel wool on hand to remove sediment buildup from the thermocouple.
Begin by turning off the gas supply and allowing the water heater to cool down completely before starting this process. Once cooled, carefully clean it with sandpaper or steel wool. A cloth soaked in a soap and water mixture can also be used for further cleaning.
Step 6: Reassemble with Care
After cleaning the thermocouple, carefully reattach the burner assembly. Refer to the photo you took earlier for accurate reassembly.
Begin by aligning the burner assembly with the mounting bracket. Gently slide it into place. Ensure all the control module’s wire connectors are securely attached to their corresponding terminals on the burner assembly. Double-check each connection for a proper fit.
Once all connections have been made, fasten any screws or clips holding the burner assembly. Ensure that everything is tightly secured before proceeding further. Also, ensure there are no loose wires to avoid potential hazards.
Step 7: Reignite the Pilot Light and Monitor the Performance
Once the burner assembly is securely reassembled, you should reignite the pilot light and monitor its performance. To do this, locate the pilot light control valve and turn it to the ‘Pilot’ position. Press down on the ignition button or use a lit match to ignite the pilot flame.
Hold the button 30-60 seconds after ignition to let the thermocouple heat up properly. Once the flame is stable, switch the indicator to the ‘ON’ position. Observe if the pilot light remains lit and steady.
If it goes out or flickers, there may be an issue with the thermocouple or gas supply. It’s best to consult a professional technician for further inspection and repairs in such cases.
What should I use to clean my water heater thermocouple?
To clean your water heater thermocouple, gently use Emery cloth sandpaper to remove any debris or build-up from the end. If you notice corrosion where the power wire connects to the thermocouple terminal, cleaning it off is essential.
You might need to detach the thermocouple from the burner assembly for thorough cleaning. This will allow you better access and control during the cleaning process.
How often should a water heater thermocouple be cleaned?
To maintain the efficiency of your water heater thermocouple, clean it every six months. Dust can accumulate on the thermocouple over time, affecting its performance.
Also, regular cleaning and maintenance of your water heater’s thermocouple will help prolong its life span and ensure optimal performance.
Keep Your Water Heater in Top Shape with Regular Thermocouple Cleaning
Cleaning your water heater thermocouple is a crucial maintenance task that should be performed regularly to ensure optimal performance. Following the step-by-step guide, you can easily clean the thermocouple yourself and avoid any potential issues caused by dirt or debris buildup.
Safety should always be your priority when working with gas appliances. If you’re uncomfortable or unfamiliar with the process, don’t hesitate to contact a professional plumber for assistance.
So, whether you’re noticing issues with your water heater’s pilot light or simply want to ensure its efficiency, cleaning your thermocouple is a smart move.