Last Updated on October 16, 2023
Nobody likes clogged drains and funky smells lingering around their bathroom. So, the linear shower drain should be kept clean and clogged-free. And keeping your shower drain clean is simple and takes just a few easy steps.
To clean a linear shower drain, you need to open the drain cover and apply a drain cleaner. Then, scrub the inside of the drain and rinse it thoroughly. That’s it. See, it’s not so hard to keep your bathroom spic and span.
We will provide a step-by-step guide on how to clean your linear shower drain, ensuring that your bathroom stays fresh and hygienic. So, let’s get started.
Clean Your Linear Shower Drain Like a Pro: Step-by-Step Instructions
Cleaning a linear shower drain requires a few steps to be taken to ensure the job is done correctly. The quick steps are:
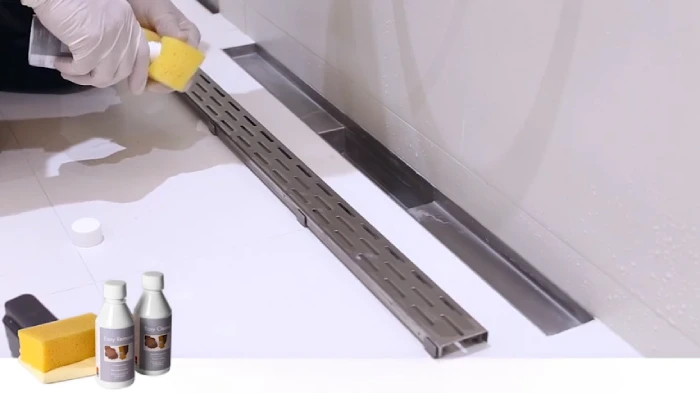
Step 1: Collect All the Necessary Supplies
Step 2: Spray and Clean the Tile Insert
Step 3: Remove the Drain Cover
Step 4: Remove Any Visible Debris
Step 8: Replace the Drain Cover And Tile Insert
Let’s take a closer look at each step in detail.
Step #1: Collect All the Necessary Supplies
You must first gather the necessary supplies to clean out a linear shower drain successfully. These supplies include gloves, a bucket, a scrub brush, and a recommended drain cleaner.
Using a drain cleaner designed specifically for shower drains containing ingredients that break down soap scum and other debris is best. It is essential to handle chemicals in drain cleaners with protective gloves.
A bucket should be available nearby to collect any water or residue from the cleaning process.
Step #2: Spray and Clean the Tile Insert
Spray the cleaner onto the drain and let it sit for five minutes. Use a soft cloth and warm water to circularly rub the cleaner into the surface of the tile insert.
Doing this will help remove any dirt, debris, mold, or other residues from its surface. Afterward, remove any visible hair or other material from around the drain using a small brush and dispose of it in the trash.
Rinse with warm water again to remove all residue before cleaning out your linear shower drain.
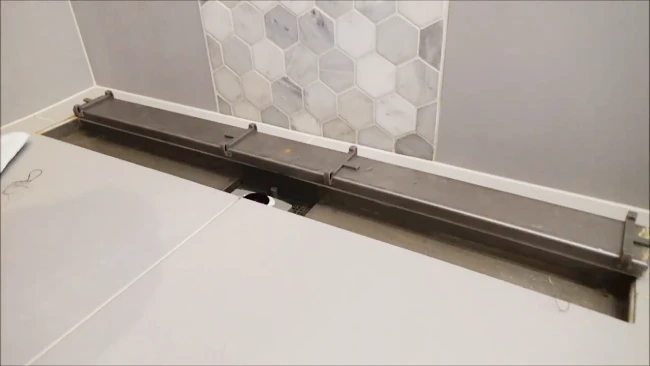
Step #3: Remove the Drain Cover
When removing the drain cover from the shower floor there are a couple of ways to go about it. The first method is to lift it up, while the second is to unscrew any screws that keep it in place.
Regardless of which technique you choose, you should handle the cover carefully so as not to injure yourself on any sharp edges or come into contact with dirt and grime.
Step #4: Remove Any Visible Debris
Inspect the drain closely to determine if it has accumulated any debris. After that, remove the stuff using protective gloves to avoid exposure to hazardous materials.
Make sure you dispose of the debris correctly in a trash can. If the drain is clogged, you can use either a plunger or a plumbing snake to dislodge the blockage.
The plunger method involves filling the drain with several inches of water and placing the plunger over it. Rapidly pushing up and down for a few minutes creates suction that may clear the blockage.
Step #5: Apply Drain Cleaner
To clear any remaining blockages, apply a drain cleaner to the system after removing the visible debris. Take care when using a chemical drain cleaner, and follow all the manufacturer’s safety instructions.
If using a natural cleaner, such as baking soda and vinegar, mixing 1/2 cup of baking soda with 1/2 cup of vinegar before pouring it down the drain is best. Allow this mixture to sit for several minutes for it to take effect.
Step #6: Scrub the Drain
Systematic drain scrubbing ensures that all the filth is removed and the system is running smoothly. To accomplish this, use a cleaning brush or scrub brush to thoroughly clean the inside of the drain and remove any visible grime or buildup.
Use a gentle yet effective motion to avoid damaging the surface of the drain while still providing adequate cleaning power.
Step #7: Rinse the Drain
Thorough rinsing of the drain with warm water is necessary to ensure that all debris has been removed. Run warm water through the drain for several minutes to achieve a successful clean. It ensures that all soap and grime have been washed away.
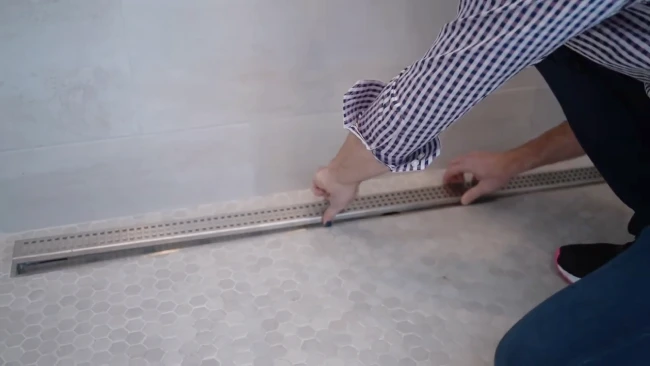
Step #8: Replace the Drain Cover and Tile Insert
Carefully replacing the cover and tile insert helps prevent any further buildup of dirt or mold while reducing future odors from the drainage system.
Depending on the type of drain, this step may involve either screwing it back in place or simply pressing it back down securely onto the drain.
Also, if you remove a tile insert during cleaning, you should replace it before finishing up. Doing so will help maintain the longevity of the drainage system and the shower area.
How often should you clean a linear shower drain?
You should clean it based on various factors, such as frequency, hair and debris going down the drain, and the condition of your plumbing system.
As a general rule, cleaning your linear shower drain once a month is recommended to prevent clogs and reduce build-up from hair, soap scum, and other debris.
But, if you have lots of people using it or long hair that sheds easily, then you may need to clean it more frequently, like every week or two weeks.
How do you keep your hair from clogging in a linear drain?
The best way to do this is by using a hair catcher designed to fit into the drain and prevent hair and other debris from entering the plumbing system. It works wonders at reducing the gunk that accumulates in the drain.
To properly use a hair catcher, you must place it over the drain’s opening and push it down until it fits snugly in place. The catcher needs to be positioned to allow water to flow freely, trapping any hair or debris before they cause any problems with clogging.
Keep Your Linear Shower Drain Clog-Free for Blissful Showers
Cleaning a linear shower drain doesn’t have to be a difficult task. Following our step-by-step guide discussed above, you can ensure your drain is clean and functioning optimally.
Remember to gather all the necessary supplies, remove visible debris, apply drain cleaner, scrub the drain, and rinse it thoroughly. After that, replace the drain cover and tile insert.
Doing this will prevent clogs and odors and save you money on plumbing services in the long run. So, what are you waiting for? Get started on cleaning your linear shower drain today.