Last Updated on November 14, 2023
Cleaning your kitchen sink diverter valve can restore your faucet’s optimal performance and ensure the sprayer and spout go smoothly together. Over time, mineral deposits, sediment, and debris can accumulate within the diverter valve, leading to many issues.
If you’ve noticed problems with your faucet, it’s likely time to give your sink diverter valve some attention. The process of cleaning a kitchen sink diverter valve involves disassembling the faucet to access the valve.
Then, you can wash away any visible mineral deposits or debris, soak the valve in vinegar to break down stubborn clogs, and carefully reassemble the faucet.
We’ll take you through each step of cleaning your kitchen sink diverter valve to ensure your faucet functions at its best.
How to Clean Kitchen Sink Diverter Valve: Step-by-Step Instructions
To clean your kitchen sink diverter valve, you should follow these steps:
- Step 1: Gather your supplies
- Step 2: Shut off water supply
- Step 3: Drain the faucet
- Step 4: Disassemble the faucet
- Step 5: Clean the diverter valve
- Step 6: Reassemble the faucet
- Step 7: Test the sink sprayer
Step 1: Gather Your Supplies
Before you can begin cleaning your kitchen sink diverter valve, you need to ensure that you have all the necessary supplies.
Make sure that you have safety goggles or a mask to protect your eyes and face from any debris or splashes that may occur during the cleaning process.
You should also have white vinegar, as it is an effective cleaner for mineral buildup. A soft brush or toothbrush will help you scrub away any dirt or grime on the valve.
Additionally, you will need silicone faucet grease for lubricating the O-rings on the diverter valve, as well as a wrench or pliers if the valve requires disassembly.
Step 2: Shut off Water Supply
Ensure you fully close the hot and cold water supply valves beneath your sink so you can safely proceed with cleaning the kitchen sink diverter valve.
To shut off the water supply, locate the valves usually situated beneath the sink. These valves are round or lever-style and connected to the water lines.
Turn each valve clockwise (to the right) until they’re fully closed. This will stop water flow to the faucet, creating a dry and safe working environment for maintenance or repairs.
Step 3: Drain the Faucet
After turning off the water supply, you need to drain the faucet completely. To do this, turn on the faucet by locating the handles or knobs.
Firmly grasp the handles or knobs and turn them counterclockwise. As you do this, water will flow out of the faucet’s spout, allowing for a completely dry faucet during the cleaning process.
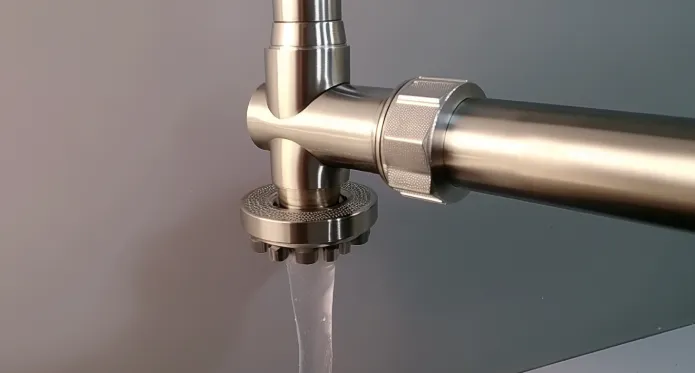
Step 4: Disassemble the Faucet
To disassemble the faucet and access the kitchen sink diverter valve, follow the appropriate method based on your faucet type.
Option 1: Faucets With Easily Removable Spouts
Identify the spout attachment point. On some faucets, the spout can be easily released.
Carefully remove the spout. This may involve loosening a grooved ring, nut, or screw. Be gentle to avoid damaging the faucet. Once the spout is removed, you’ll have access to the diverter valve.
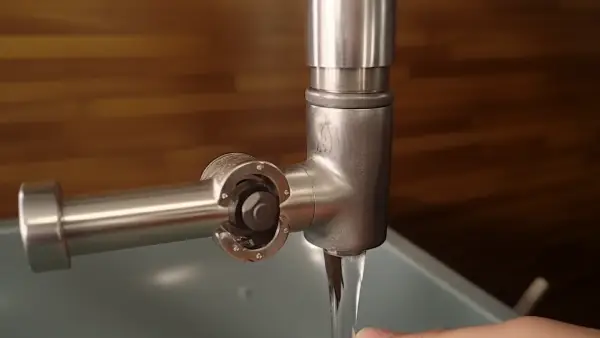
Option 2: Faucets With Non-removable Spouts
If your faucet doesn’t have an easily removable spout, you’ll need to remove the spout tee and disconnect the flexible hoses instead.
To disconnect the flexible hoses and remove the spout tee from your kitchen faucet, Use a wrench or pliers to carefully loosen and disconnect these connections, taking care not to damage the hoses or fittings.
Once the hoses are disconnected, you can proceed to remove the spout tee, which may involve unscrewing it or using a suitable tool, depending on your faucet’s design.
Step 5: Clean the Diverter Valve
Now, use a soft brush or toothbrush to scrub away any noticeable mineral deposits or debris surrounding the diverter valve.
Soak the diverter valve in white vinegar, allowing it to soak for up to 24 hours for tough mineral deposits.
After soaking, ensure it is thoroughly cleaned with the brush, avoiding the use of any metal tool that could damage the valve. Then, rinse it thoroughly with water from the faucet, ensuring that all vinegar and debris are removed.
Step 6: Reassemble the Faucet
After cleaning the diverter valve, it’s time to reassemble the faucet. Apply a small amount of silicone faucet grease to lubricate the O-rings on the diverter valve and ensure a proper seal when reassembling the faucet.
For faucets with removable spouts, reattach the spout and carefully tighten the grooved ring, nut, or screw.
If the spout isn’t removable, reattach the tee and hoses, making sure they’re tight. Follow the reverse order of disassembly.
Step 7: Test the Sink Sprayer
Now, test your sink sprayer once all parts are reassembled. Turn the water supply back on by opening the water supply valves under the sink or the main shutoff valve.
Observe for improved water flow and pressure of the kitchen sink, which will indicate if the cleaning process has been successful.
How can you tell if the kitchen sink diverter valve needs cleaning?
You can easily determine whether your kitchen sink diverter valve needs cleaning by keeping an eye out for several tell-tale signs.
One sign is low or uneven water pressure, which mineral deposits, sediment, grit, or dirt inside the valve may cause.
If you’ve tried cleaning the aerator but are still experiencing these problems, this strongly suggests that your diverter valve is in need of attention.
Another critical factor to consider is the difficulty in transitioning smoothly between the spout and spray functions, as this is a primary function of the diverter valve.
If you notice that the water isn’t diverting correctly or that the switch is challenging to operate, it’s a definitive sign that the diverter valve needs attention.
How often should you clean the kitchen sink diverter valve?
To ensure proper maintenance, regularly inspect and clean the kitchen sink diverter valve at least once a year or as needed so that it continues to function smoothly.
The frequency of cleaning depends on your water quality and usage patterns. If you live in an area with hard water or notice reduced water pressure or functionality issues, consider cleaning the valve more frequently, perhaps every six months or as needed.
Clean Your Kitchen Sink Diverter Valve for Optimal Faucet Performance
You now know how to clean the diverter valve on your kitchen sink and keep your faucet running smoothly. Just shut off your water supply, disassemble the faucet following the appropriate method, and clean the diverter valve with vinegar and a soft brush.
You need to maintain your sprayer and spout on a regular basis to avoid problems with low water pressure.
Spending a little time each year on this simple task will ensure that your kitchen faucet operates at its best, making your daily chores and cooking tasks a breeze. Keep your kitchen sink diverter valve in top shape, and you will enjoy reliable performance for a long time.