
Last Updated on November 14, 2023
Plastic sprayer is an essential component that helps with various cleaning tasks. Over time, though, mineral deposits and grime can accumulate in the plastic sprayer head, affecting its performance and hygiene. To maintain a hygienic and efficient kitchen, you need to clean it properly.
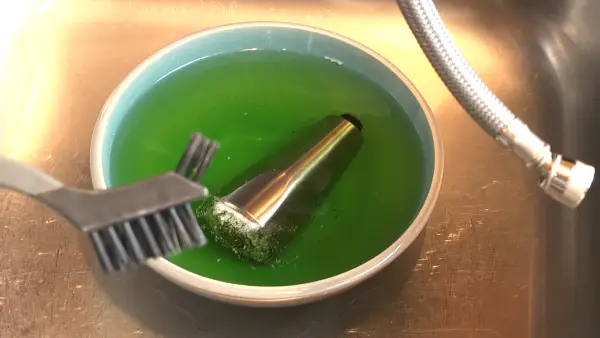
To clean the kitchen sink plastic sprayer, detach the sprayer head or part of the faucet assembly. Submerge the head in soapy water and allow it to soak for 15-20 minutes. Use a toothbrush or a soft bristle brush to gently scrub the sprayer head and rinse it under running water to remove any residue.
We will assist you in cleaning your plastic sprayer. With just a few simple steps and some common household items, your sprayer will work like new.
How to Clean a Plastic Sprayer from Your Kitchen Sink: Step-by-Step Guide
To clean a plastic sprayer in your kitchen sink, follow these steps:
- Turn off the water supply
- Remove the sprayer head (if applicable)
- Soak in warm, soapy water
- Scrub away debris
- Remove mineral deposits with vinegar (if needed)
- Rinse thoroughly
- Dry and reassemble
- Test the sprayer
Step 1: Turn Off the Water Supply
Ensure you’ve turned off the kitchen sink water supply to avoid any accidental sprays while cleaning the plastic sprayer from your kitchen sink. Locate the shut-off valve underneath the sink. Turn the valve clockwise until it’s fully closed.
Step 2: Remove the Sprayer Head (If Applicable)
Once you’ve turned off the water supply, you must detach the sprayer head for deep cleaning. To remove a detachable sprayer head, grip it firmly and twist it counterclockwise until it comes loose from the hose or faucet. Be cautious not to apply too much force as it may damage the threads.
Step 3: Soak in Warm, Soapy Water
After detaching the head, submerge the sprayer head in warm, soapy water and let it soak for about 15-20 minutes. The warm water will help soften the residue, while the mild dish soap will remove any dirt and bacteria.
Step 4: Scrub Away Debris
During the soaking process, gently agitate the sprayer head to enhance the cleaning action further. Take a toothbrush or soft bristle brush and gently scrub away any debris that may still be lingering on the sprayer head. Pay close attention to the nozzle openings and any crevices where dirt might be trapped.
Be thorough in your scrubbing, ensuring you reach all holes of the sprayer head. Continue scrubbing until you’ve removed all visible debris.
Step 5: Remove Mineral Deposits with Vinegar (If needed)
If you notice mineral deposits (white or greenish buildup) on the sprayer head, mix equal parts white vinegar and warm water in a bowl & submerge the head. Let it soak for 30 minutes to an hour.
The acidic nature of vinegar helps dissolve these mineral deposits, making it easier to remove them. After soaking, use a scrub brush or an old toothbrush to remove any remaining residue.
Step 6: Rinse Thoroughly
Make sure to thoroughly rinse the sprayer head under running water to ensure all soap and vinegar residue is completely washed away. Hold the sprayer head under the faucet and allow the water to flow. Rotate the sprayer head to ensure water reaches all areas and flushes out any remaining residue.
Step 7: Reassemble all the Parts
After using clean towels or paper towels to remove any moisture, carefully reassemble all the parts you removed to complete the cleaning process. Take your time to properly align and connect all the parts, ensuring they fit together smoothly.
Step 8: Test the Sprayer
Now, turn on the water supply and test the sprayer to ensure it’s working properly. Start by pressing the trigger and observing the spray pattern. It should be even and consistent, without any sputtering or irregularities. Check the water pressure. The sprayer should deliver a strong, steady stream of water.
What Can I Use to Clean a Kitchen Sink Faucet Sprayer?
If you’re looking for alternative cleaning solutions, there are several options you can try to clean your kitchen sink faucet sprayer.
1. Commercial Faucet Cleaners
You can use a commercial faucet cleaner to clean the kitchen sink faucet sprayer. These cleaners are specifically formulated to remove mineral deposits, stains, and grime from faucet components. These cleaners can dissolve tough buildup and make your sprayer look shiny.
2. Lemon Juice
Another option to clean your kitchen sink faucet sprayer is to use lemon juice or a vinegar-water mixture. These ingredients effectively remove mineral deposits and add a fresh scent to your sprayer.
Cut a lemon in half and rub it over the sprayer head. This allows the lemon juice to sit on the sprayer for a few minutes, breaking down any buildup that may be present.
After allowing the lemon juice to work its magic, rinse the sprayer with water and scrub if necessary. The citric acid in the lemon juice helps dissolve the mineral deposits, leaving your sprayer clean and fresh.
3. Rubbing Alcohol
For cleaning a kitchen sink faucet sprayer, consider using rubbing alcohol in addition to lemon juice or vinegar-water mixture. Rubbing alcohol is an effective cleaning agent that can help dissolve sticky residues that may accumulate on the sprayer head.
To clean the sprayer, apply a small amount of rubbing alcohol to a cloth or sponge. Gently wipe down the sprayer head, ensuring that all areas are covered. The rubbing alcohol will help break down any grease or grime that may be present.
After wiping the sprayer head with rubbing alcohol, rinse it with water to remove any remaining residue. This will leave your sprayer clean and ready for use.
How do I soak a sink nozzle in vinegar for regular cleaning?

If you want to clean your sink nozzle regularly, try soaking it in vinegar for a thorough cleaning. To do this, fill a plastic bag with a mixture of half water and half vinegar. Make sure there’s enough liquid to submerge the faucet head completely.
Place the liquid-filled bag over the nozzle and secure it with a rubber band. Let it soak for about 30 minutes to one hour, depending on the sensitivity of your fixture finish. For more delicate finishes, don’t exceed 30 minutes of soaking time.
The vinegar will help dissolve any mineral deposits or grime that has built up on the nozzle, leaving it clean and free-flowing. After soaking, simply remove the bag and rinse the nozzle with water.
Keep Your Kitchen Sink Sprayer Clean and Enjoy a Healthier Cooking Environment
Cleaning a plastic sprayer from your kitchen sink is a straightforward process that can be done using common household items. If you just follow our step-by-step guide and use effective cleaning products, you can effectively clean a plastic sprayer head from your kitchen sink. Do regular maintenance that will not only extend the life of your sprayer but also contribute to a cleaner and more hygienic kitchen environment. Take note: a little care goes a long way in keeping your kitchen sink sprayer in tip-top shape.