Last Updated on October 17, 2023
Keeping toilets clean is essential for hygiene and sanitation. But, it is difficult to properly clean a toilet when the water level in the bowl is too high. So now the question is, how do you lower the water level for cleaning?
You need to locate the water shut-off valve, lift the tank lid, lift the flapper or float, flush the toilet, remove additional water and clean the toilet bowl. Then turn on the water supply after completing all these steps.
Below are detailed instructions for lowering the water level in a toilet bowl to make cleaning easier. And we will also discuss why it is important to lower the water level before cleaning and recommend how often one should do so.
How to Lower the Water Level in Toilet Bowl to Clean: 7 Simple Steps

Cleaning the toilet bowl can be a necessary but sometimes messy task. Lowering the water level before cleaning the toilet bowl can make the process more convenient and efficient. Here’s a step-by-step guide on how you can lower the water level in the toilet bowl for cleaning:
- Step 01: Locate the water shut-off valve
- Step 02: Lift the tank lid
- Step 03: Lift the flapper or float
- Step 04: Flush the toilet
- Step 05: Remove additional water
- Step 06: Clean the toilet bowl
- Step 07: Turn on the water supply
Step 01: Locate the Water Shut-off Valve
Identifying the water shut-off valve is a necessary step to complete the process of cleaning the toilet bowl. The valve is typically located on the wall behind or near the toilet and looks like a small metal or plastic component. Then stop it by turning it clockwise (to the right).
Step 02: Lift the Tank Lid
Lifting the tank lid provides access to the interior components of the toilet. This allows for inspecting and cleaning certain parts, such as the flush valve, fill valve, flapper and overflow pipe. Remove any debris or buildup inside the tank by using a stiff brush or other appropriate tool.
Step 03: Lift the Flapper or Float
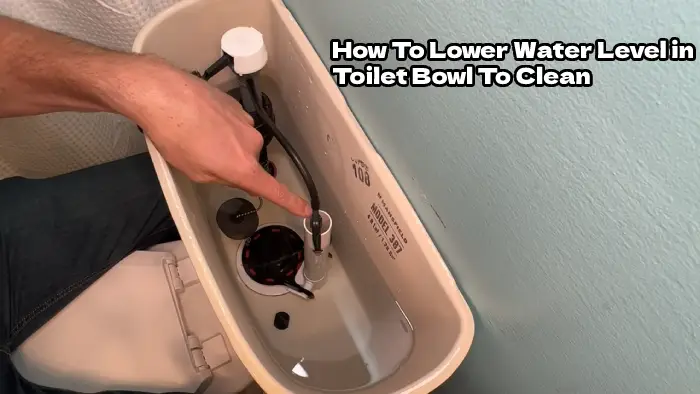
By manipulating the flapper or float connected to the flush valve, it is possible to control the water entry into the bowl. The flapper or float is a rubber device that sits on top of the flush valve when it’s in its resting position.
Lifting up this rubber piece will stop water from entering the toilet bowl, allowing for a lower water level. This position is beneficial when cleaning the toilet as it allows access to areas that may have been submerged under normal water levels.
Step 04: Flush the Toilet
Once the flapper or float has been lifted, pressing and holding the toilet handle initiates emptying most of the water from the bowl and storing clean water in the bowl. Gravity pulls most freshwater from the tank after releasing a valve and sending it through the drainpipe. The amount of water removed depends on how long one holds down the handle.
Step 05: Remove Additional Water
To effectively clean a toilet bowl, it is essential to decrease the amount of freshwater present. This is accomplished using a cup or bowl to remove the excess water or using a sponge to absorb it. When using a cup or bowl, emptying it into a bucket or sink before disposing of it is crucial.
When using a sponge, wring it out into a separate container after soaking up the water. This process reduces the amount of liquid present in the toilet bowl. This allows for enhanced cleaning of surfaces such as walls and the floor of the toilet bowl.
Step 06: Clean the Toilet Bowl
Once lower water is accomplished, you can use preferred cleaning products to remove any dirt or debris left on the bowl surfaces.
Start by scrubbing with a cleaning brush or other type of hard bristle brush. Focus on any areas that need extra attention, such as behind the rim and under the seat. Ensure to get around all sides of the toilet bowl for complete coverage.
After, rinse out any residue with water. Use a wet cloth or paper towel to wipe the bowl, and then use a dry cloth or paper towel to finish it off.
Step 07: Turn on the Water Supply
Having completed the cleaning process of the toilet bowl, it is necessary to turn back on the water supply to use the toilet.
To do this, you must rotate the main water shutoff knob near the toilet’s base counterclockwise until completely turned. This will restore water flow and fill up the toilet bowl again.
Why should I lower the water level in the toilet bowl before cleaning?

By removing excess water from the bowl, you’ll have better access to all surfaces, making it easier to clean hard-to-reach areas and remove stubborn stains. Also, lowering the water level provides a better angle for scrubbing and wiping, leading to more thorough and efficient cleaning.
But that’s not all. Lowering water from the bowl can also help prevent overflow during vigorous cleaning. With less water in the toilet bowl, you can scrub and wipe confidently, knowing you won’t accidentally cause a messy and unpleasant spill.
How often should I lower the water level and clean the toilet bowl?
Regularly maintaining the sanitation of the basin is essential for proper hygiene and avoiding buildup. Lowering the water level in the toilet bowl and cleaning it at least once a week, depending on individual usage. This will help to prevent any stains or odors from accumulating over time.
Keep Your Toilet Clean and Hygienic
Prior to cleaning a toilet bowl, it is important to lower the water level. Allowing the water to settle and recede helps remove any leftover residue in the bowl, making it easier to scrub and disinfect.
Following the steps outlined above will enable you to turn off the water, lift the tank lid and flapper or float. You can also flush your toilet, remove the additional water, and clean the toilet bowl.
Cleaning is necessary regularly, preferably once or twice a week, depending on usage and number of occupants in the household. Doing so will help prevent germs build-up, eliminate odors, and keep the toilet looking fresh all year long.
Taking these steps can help ensure that your toilets remain hygienic and safe for everyone who uses them.

